


Endless Chain Quilt Pattern Now Available

The Endless Chain pattern was inspired by a beautiful 1930s antique quilt.
The pattern uses foundation paper piecing. Its simple design makes it a great introduction to this technique.
The pattern is available for purchase in the Make it Do pattern shop.
Note: This is a downloadable PDF pattern.
The block size is 12″ finished.
Materials List for Throw Quilt – 60” x 72”
- 4-1/2 yards of assorted scrap fabric (smallest pieces must be at least 3” x 8-1/2”)
- 5-1/4 yards of background fabric
- 120 copies of paper templates (page 7)
- 5/8 yard binding
- 4 yards backing fabric
- batting of choice
- Flatter or Best Press spray highly recommended
- pins or washable glue stick
Purchasing Information:
Download links expire after 3 download attempts. Please download the pattern file to your computer for future use.
This pattern is a PDF file instant download. Please be sure to check your email address listed in your PayPal profile (or email address you entered), the instant download link will be sent to that email address.
Sell finished items! You (the purchaser of this pattern) can sell finished
thread catchers made using this pattern (on a home based scale).
If you choose PayPal’s e-check option, the instant download will take 5-7 days for the e-check to clear and for the instant download link to be sent.
You do NOT need a PayPal account to purchase, simply enter a debit or credit card at checkout by clicking the ‘Don’t have a Paypal Account?’ link.


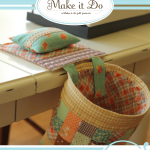
Thread Catcher Pattern now available

The Thread Catcher Pattern is now available in the Make it Do Pattern Shop.
It is perfect for staying clean and organized while quilting and sewing.
Pattern includes instructions and photographs for making the thread catcher basket, and base with pincushion.

Keep your sewing space neat and tidy with a wide open wastebasket.
The pattern contains easy instructions for a scrappy postage stamp design,
but you can easily make up your own favorite block design.

The pincushion is handy right next to your machine or on your ironing board.

This pattern is such a perfect way to keep organized and tidy in style. Make one for yourself and a few more for your quilty/sewing friends.
Materials list:
Fabric- (Suitable fabrics include quilter’s cotton or linen)
- Three (3) – 1/4 yard or Fat Quarters that go well together
- 5” x 8” scrap of fabric for pincushion liner -a light colored fabric is suitable
- Pieced patchwork measuring 3 1/2” x 11 1/2” – We used thirty-three (33) 1-1/2” scrapsquares to create a postage stamp patchwork and have provided instructions in this pattern.But if you choose, any pieced design will work. (A solid fabric may also be used.)
- Optional – Ribbon, lace, or other desired trim for base or pincushionMaterials-
- 18” of 1/2” wide plastic boning (used for corset making)
- 5/8” Package of Velcro -sew on tape (do not use sticky back tape!)
- 5” plastic base insert (We use Ikea Bendable Chopping Mat cut to size. Several layers ofdense, heavy cardboard may also be used.)
- 1/4 yard Pellon Fusible Fleece
- 3/4 cup fine sand (sand is required for the weight – do not substitute walnut shells)
- Optional 1” x 4” magnetic stripYou will also need:
- Ruler
- Masking tape
- Water soluable marking pen
- Hot glue gun and glue sticks and (optional) Tacky Glue
- Chopsticks or turner tool
- Needle and thread for sewing pincushion liner closed
Purchasing Information:
Download links expire after 3 download attempts. Please download the pattern file to your computer for future use.
This pattern is a PDF file instant download. Please be sure to check your email address listed in your PayPal profile (or email address you entered), the instant download link will be sent to that email address.
Sell finished items! You (the purchaser of this pattern) can sell finished
thread catchers made using this pattern (on a home based scale).
If you choose PayPal’s e-check option, the instant download will take 5-7 days for the e-check to clear and for the instant download link to be sent.
You do NOT need a PayPal account to purchase, simply enter a debit or credit card at checkout by clicking the ‘Don’t have a Paypal Account?’ link.


